
The M13 experiment: using PEC for unguided imaging
The usual recommendation to a beginner is to get a sturdy mount and a small refractor. Countless threads on Cloudy Nights go more or less like this:Pro: "Spend as much as you can on the mount but on the other hand do not buy a cheap telescope."
Noob: "That's over my planned budget but I pulled the trigger anyway. Now I have no money left for food."
Pro: "You definitely want to use auto guiding."
Noob: "NO MONEY LEFT."
Pro: "Hm, well, you might try unguided. Try 1 min subs."
One important hint is missing. I recommend to train the mount's Periodic Error Correction (PEC) and turn it on for unguided imaging. The procedure is to follow a bright star near the celestial equator and watch it in a cross hair eye piece or on the camera screen. The task is to keep the star centered using the hand controllers arrow keys. After a painstaking 20 minutes the mount as saved correction data that can be used for every imaging night from now on. Some low priced mounts do not have this feature or cannot store the data permanently. Thus I recommend to double check that the mount does keep them permanently. Some brands call this function permanent PEC or PPEC. Others just call it PEC and it is permanent.
The open question is this: does it work? Two answer this question I made an experiment. The experiment is to put up a simple setup comprising an entry level mount with PEC trained, a small refractor and an unmodified DSLR. The object is M13, the Great Cluster in Hercules. Imaging time is roughly two hours, something that everyone can do at a weekday and still get enough sleep. Here is what I did:
Data Acquisiton and Calibration Frames
I put up the tripod level, put my Skywatcher EQ6-R on top. Polar alignment was done using the polar scope with the common clock dial reticle. Next I put my small refractor on top, the well known 65mm quad sold by Astro Tech, Telescope Service and others a few years ago. Focal length is 420mm. The camera was an unmodified Canon T7i (800D in Europe). Please mind: no guider, of course. It is meant to be an unguided experiment. Neither did I use electronic helpers for polar alignment nor did I do a drift alignment (also known as the Scheiner method). All simple and straight forward as a beginner would probably do. No computer was used, no plate solving was done. Just a 3 star alignment using the mounts hand controller. Focus was done in live view with a self made Bahtinov mask. I plugged in a simple cable type $20 intervalometer and set it to 1 minute. Camera settings were ISO 400, mirror lock active, raw of course. I selected M13 from the hand controllers Messier list and made no corrections. After almost an hour of 1 min shots the temperature had dropped so dramatically that I interrupted the capture, slewed to Vega and focused again using the B-mask. Back to M13 and a another hour of data. Although I usually do and recommend I did not take any flats this time. Since I have the T7i I stopped using darks because they really do not make a difference for my amount of light pollution and sub exposure length. I did use the master bias I have for this camera, though. I guess this is what a beginner would be able to do for the first light.Analysis
The over all number of sub exposures was 123 subs. I sorted out the first few frames because I started a bit too early and the sky was not really dark. I also sorted out a bunch that was out of focus caused by the temperature drop. The star diameter is usually measured as the Full Width at Half Maximum. Here is a plot in chronological order, the removed subs marked by an X: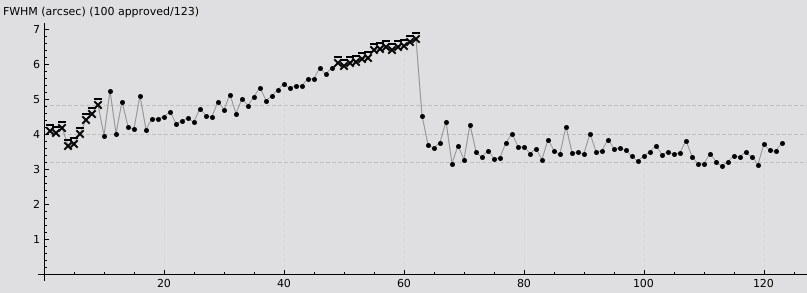


Result
As the object is small compared to the field of view the image was cropped from it's original 6000 x 4000 pixels to 2720 x 1530 pixels. As the idea of this experiment was to figure out what a beginner can expect from an unguided session only a basic processing was applied. I intentionally did not do a deconvolution as this would not be within a beginner reach. Here is a small version of the result. For native resolution click the link below.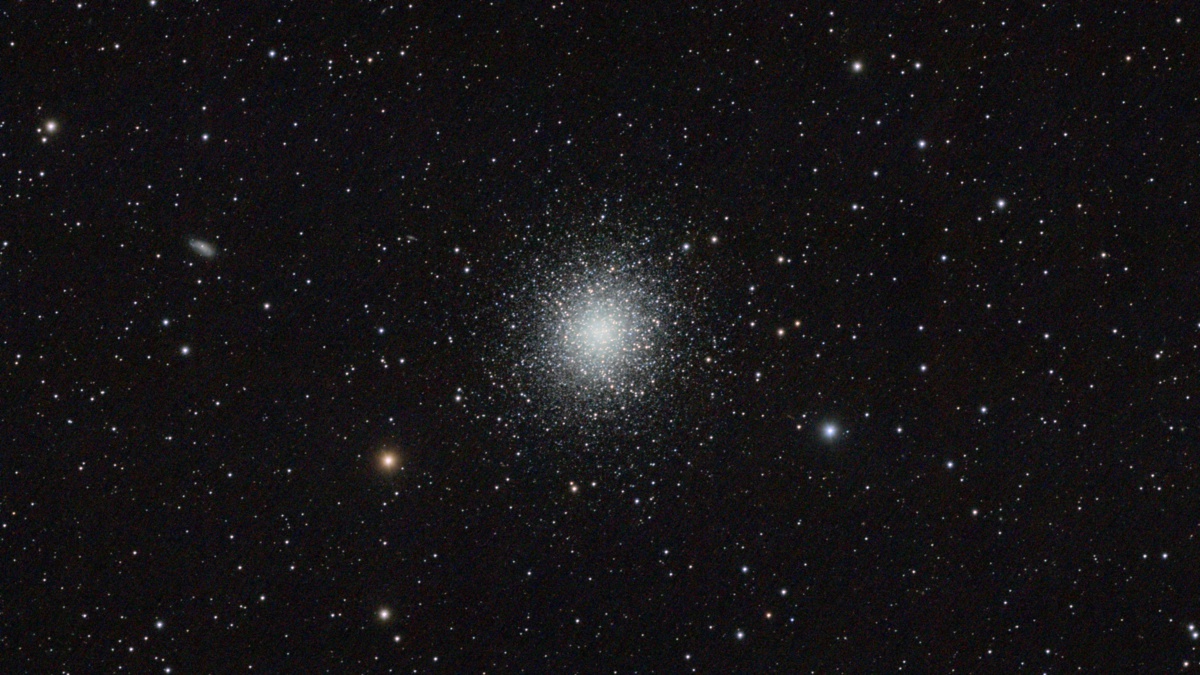 full resolution
Conclusion
The standard advice "sturdy mount, small refractor, 1 min subs" works well. In addition I recommend to train PEC for unguided imaging. Please note that a flat field astrograph with a triplet lens including one FPL53 element was used for this test. A doublet should be an FPL53/lanthan type at least. Comparing an FPL53 triplet and FPL53 doublet the doublet will come up with a slightly greater star diameter. Any lower quality glass will bloat the stars and add colored halos to the stars. I have seen images where the blue halo was several times the star diameter. There are only very few camera lenses that can be used for astro photography and most of them are prime lenses. With good glass decent images can be taken without guiding but the technique is limited to brighter and larger objects.Questions?
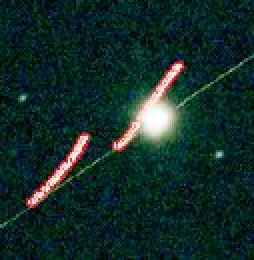
Yes, the gentleman up there. Beg your pardon, what did you say? Ah, how the image compares to a guided image from a large telescope and longer subs? Well, there is always room for improvement, but see yourself. Here is a toggle image showing a tight crop of the above vs. 2 hours and 40 minutes taken with an 8'' Ritchey–Chrétien telescope at 1100 mm focal length using guided 2 minute subs.
Yes, over there! Ah, no. No, I do not recommend to start with such a big telescope. First it needs a larger and more expensive mount. Second finding the alignment stars in such a small field of view can be tricky. Third some of the longer scopes need off axis guiding that was used here. This is nothing a beginner can handle. I recommend to keep the first setup small and the workflow as simple as possible. You can update step by step as your skills improve.
Thank you!
Back to Media